How to Create an E‑commerce Store with HamroLink in Nepal
Start your online store in under 30 minutes – no coding, no developer, no expensive fees. FonePay QR, delivery zones, and order tracking built for Nepal.

Most small businesses in Nepal still rely entirely on Facebook messages. Orders get buried in DMs. Payments are confirmed over the phone. The same customer questions repeat daily. When things get busy, orders slip through the cracks and customers lose trust.
There is a better way – a dedicated e‑commerce website where customers can browse products, pay with FonePay, and track their orders without messaging you. This guide walks you through the entire process of building a professional online store using HamroLink as an example platform, from your first login to a real, working checkout. Every step includes the actual screenshot so you can follow along even if you’ve never built a website before.
Disclosure: HamroLink is a website builder designed for Nepali businesses. We are not affiliated with the company, but we have tested the platform extensively to create this honest walkthrough. The principles in this guide apply to any similar e‑commerce tool you choose.
What You Will Have After Completing This Guide
By the time you finish, you will have:
- ✅ A live e‑commerce site with your own web address (e.g.,
yourshop.hamrolink.com) - ✅ At least one product listed for sale in Nepali Rupees
- ✅ FonePay / QR code payment fully integrated
- ✅ Delivery zones and shipping fees configured for your areas
- ✅ A checkout process that customers can actually complete
- ✅ A dashboard to track revenue, manage orders, and print shipping labels
- ✅ A customer‑facing order tracking page that reduces "Where is my order?" messages
This is a complete online store – not a Facebook page or a Google Form.
Who This Guide Is For
- Shop owners in Kathmandu, Biratnagar, Pokhara, Dhankuta, or anywhere in Nepal
- Anyone currently selling through Facebook and wanting a more professional system
- Small businesses that cannot afford a custom developer (costs often range from रू50,000 to रू2 lakh+)
- Phone shops, clothing stores, electronics sellers, grocery stores, freelancers, and consultants
⚡ Quick Overview: The 22 Steps in 5 Phases
| Phase | Steps | What Happens |
|---|---|---|
| 🔐 Setup | 1–5 | Sign in, choose a template, provide your business details |
| 🎨 Design | 6–9 | Customize your store’s appearance with the visual editor |
| 📦 Products | 10–13 | Add products, variants, images, and descriptions (AI assisted) |
| 🚚 Delivery & Checkout | 14–20 | Define delivery zones and test the full checkout flow |
| 📊 Orders & Tracking | 21–22 | Process orders and let customers track deliveries |
You can complete each phase in one sitting. Bookmark this page and work through the steps in order.
Phase 1: Setup (Steps 1–5)
Step 1: Sign In to HamroLink
Go to HamroLink and sign in. If you are a new user, click Register, verify your email address, and then return here. You can also use Continue with Google – this is faster and avoids creating another password.
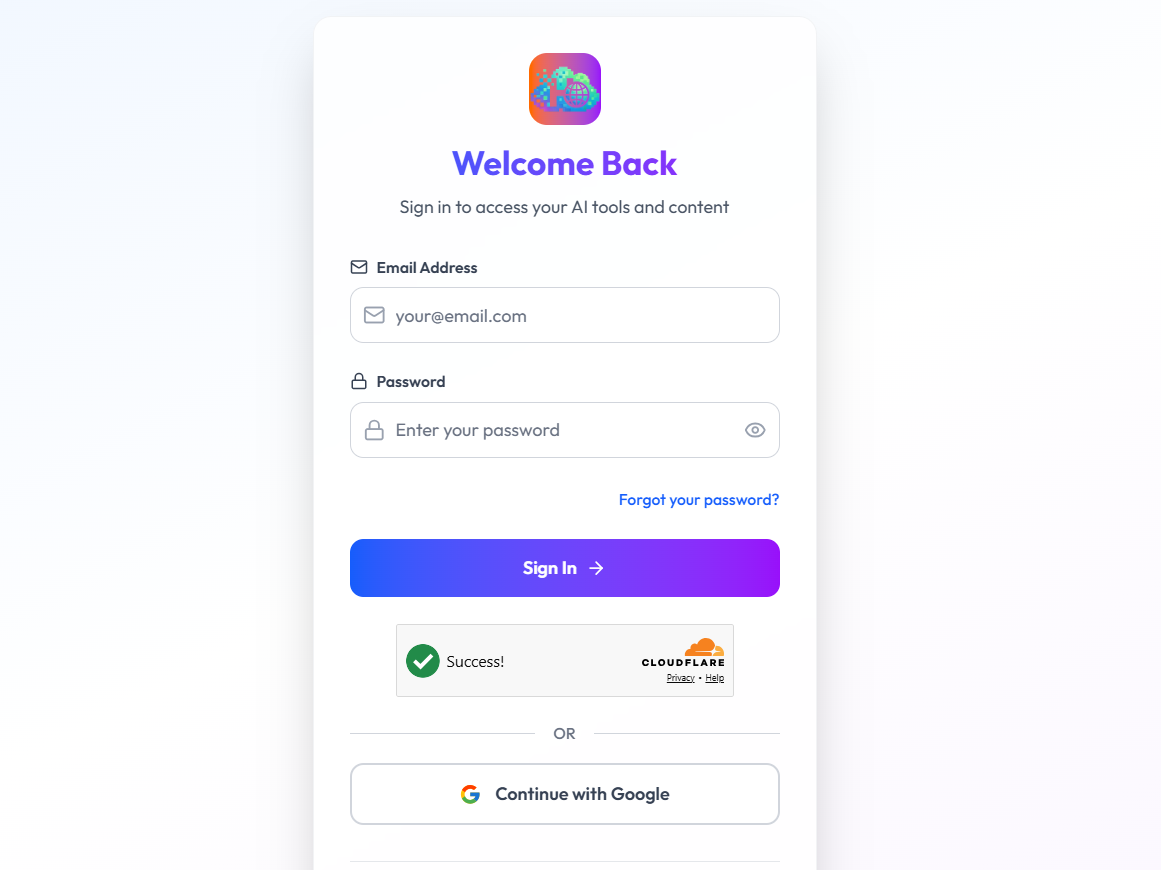
Practical tip: Use a Gmail account that you already manage your business with. It keeps all your customer notifications in one place.
Step 2: Explore Your Dashboard
After logging in, you land on the Dashboard – your central control panel. Take a moment to understand the main areas.
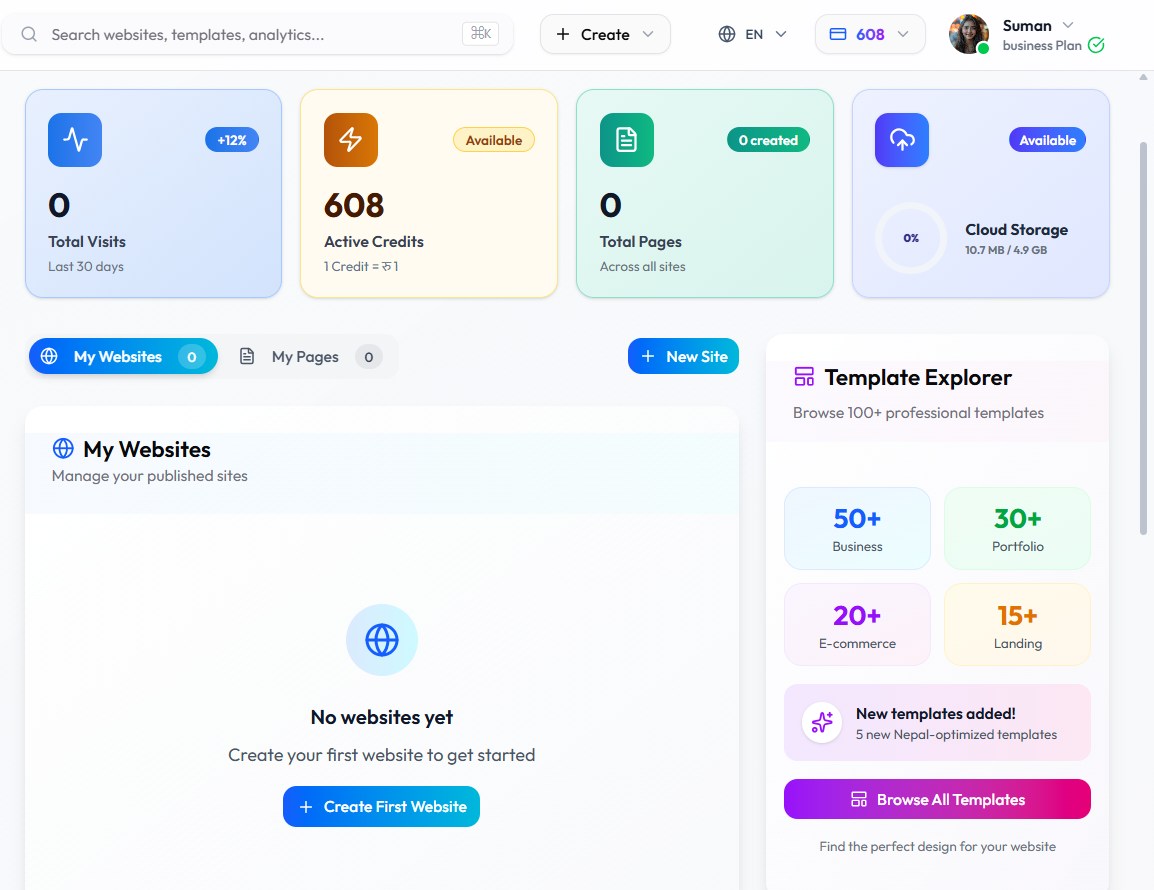
Four panels are immediately visible:
- Total Visits – traffic to your websites over the last 30 days
- Active Credits – your account balance (1 Credit = रू1; used for optional add‑ons)
- Total Pages – the number of pages across all your sites
- Cloud Storage – how much of your 4.9 GB allocation is used
On the right, the Template Explorer shows over 100 templates. More than 20 are specifically built for e‑commerce, already including product pages, a checkout system, and QR payment support.
Step 3: Choose an E‑commerce Template
Click + New Site or Browse All Templates. Then click the E‑Commerce filter tab. The platform currently offers 30+ e‑commerce templates. Use the search bar to filter by your business type – for example, searching "mobile" shows layouts designed for phone shops. Other useful search terms: "fashion," "grocery," "electronics," "general store."
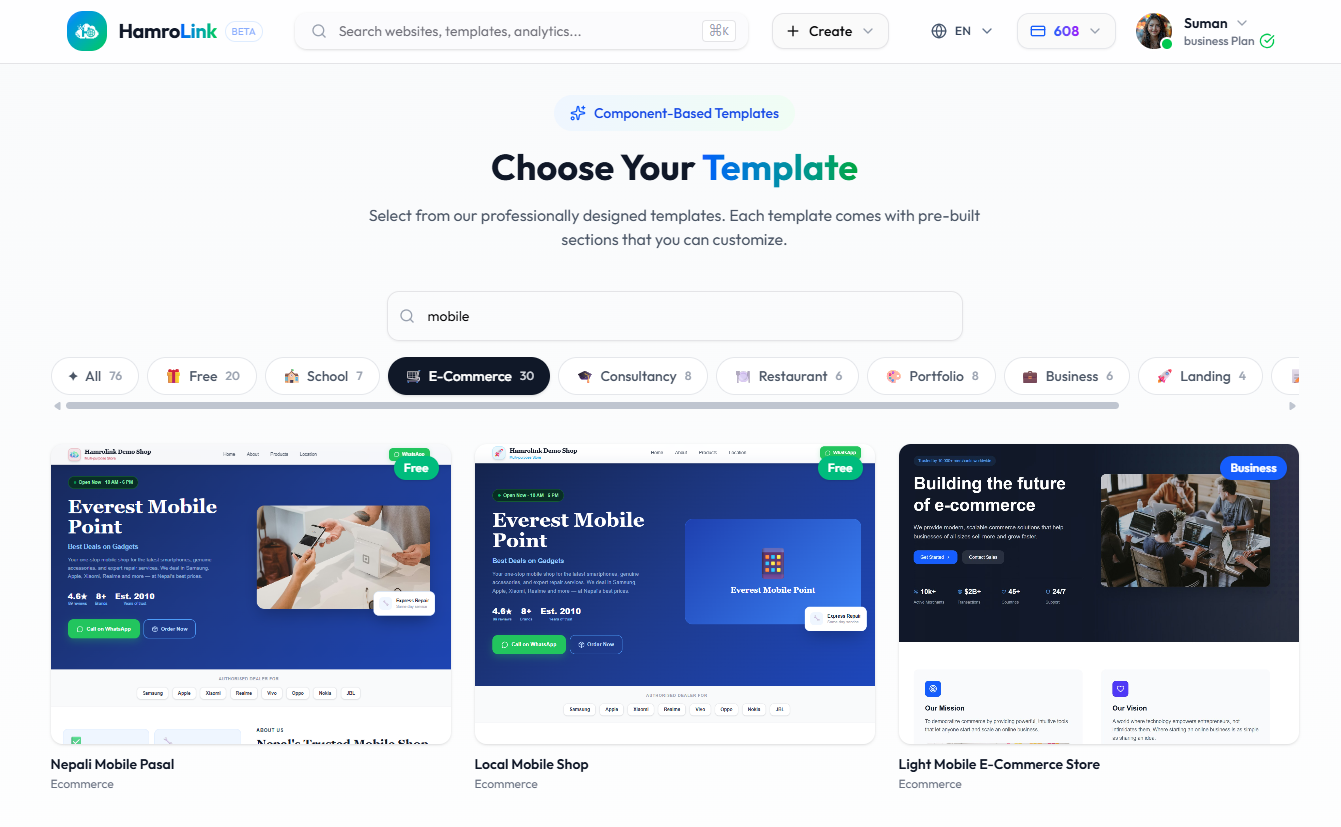
Some templates that work well for Nepali businesses:
- Nepali Mobile Pasal – for phone and accessory shops
- Local Mobile Shop – a clean layout for gadget sellers
- Light Mobile E-Commerce Store – a modern, business‑focused design
Click any template to begin. You can change it later if needed.
Which template is best?
For a general product store, any template under the E‑Commerce tab works. The key is that the checkout and product systems are already in place – you only need to customize the content.
Step 4: Fill in Your Business Details
After selecting a template, a "Create Your Website" form opens. Fill it carefully. The information you provide here is used by HamroLink's AI to generate initial page content, so the more accurate you are, the less manual rewriting you’ll need later.
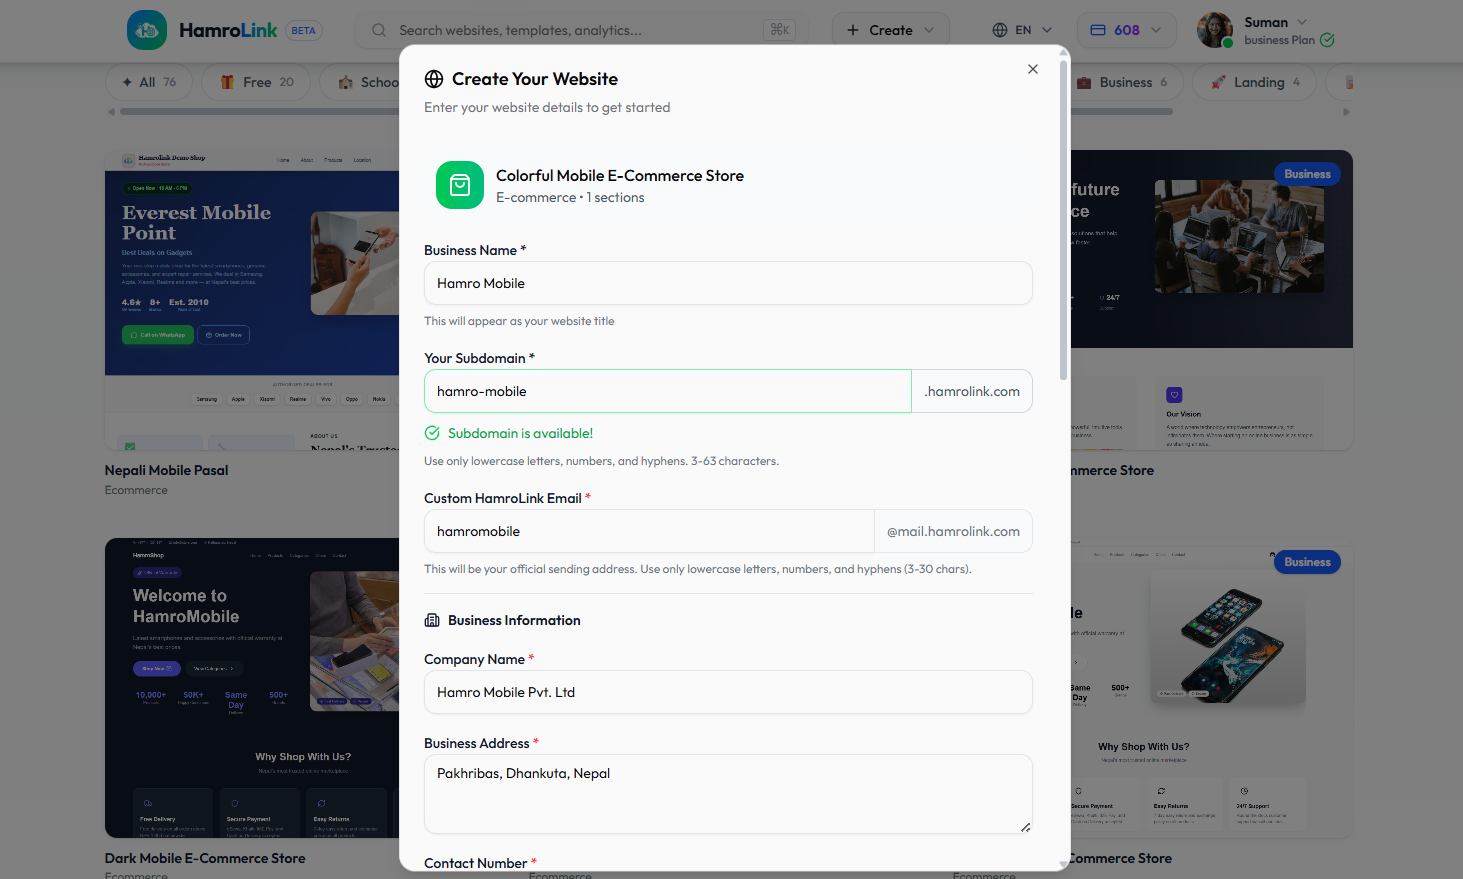
| Field | What to Enter | Example |
|---|---|---|
| Business Name | Your shop's public name | Hamro Mobile |
| Your Subdomain | A short, memorable URL slug | hamro-mobile → hamro-mobile.hamrolink.com |
| HamroLink Email | The email address shown as the sender for order notifications | hamromobile@mail.hamrolink.com |
| Company Name | Your legally registered name (or repeat your shop name) | Hamro Mobile Pvt. Ltd |
| Business Address | Your physical shop address | Pakhribas, Dhankuta, Nepal |
| Contact Number | A customer‑facing phone number | +977-XXXXXXXXXX |
The system checks your subdomain in real time. If your first choice is taken, add your location – e.g., hamromobile‑dhankuta. A green "Subdomain is available!" message confirms you can use it.
Step 5: Write Your Business Description and Upload a Logo
Scroll down in the same form to complete your store profile. This step is crucial for AI‑powered content generation.
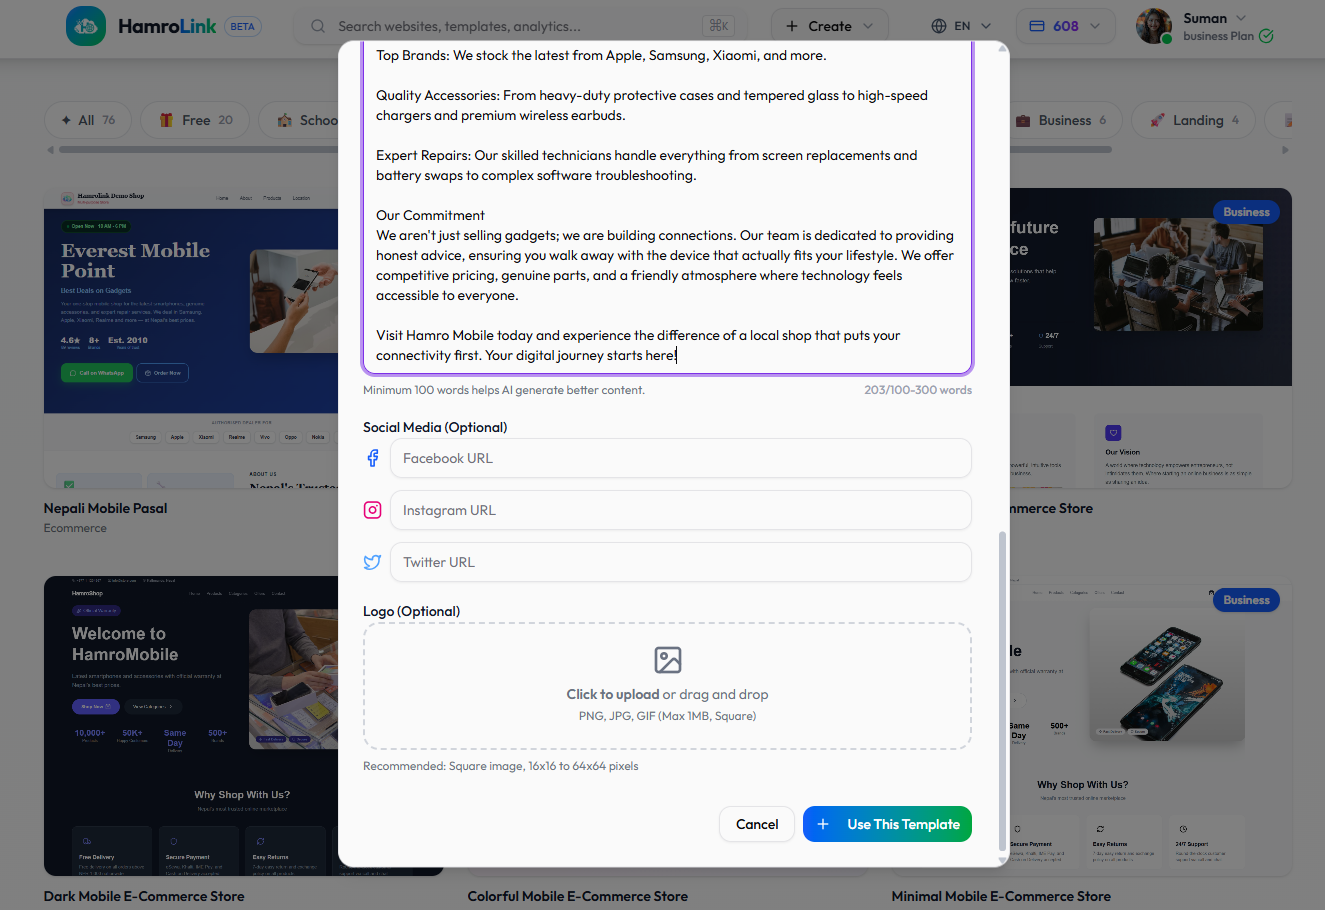
Business Description (Minimum 100 words):
Write clearly about what you sell, your location, and why customers should trust you. Mention the brands you carry, any services you offer, and how long you have been in business. The AI uses this description to generate headlines, about sections, and feature text – so be specific and honest.
Social Media Links (Optional):
Add your Facebook, Instagram, and X (Twitter) URLs. These icons will appear on your website, making it easier for customers to find you across platforms.
Logo (Optional but strongly recommended):
Upload a square logo – PNG, JPG, or GIF, max 1MB, and at least 64×64 pixels. A logo instantly makes your store look more trustworthy than a plain text name.
Click "Use This Template" when ready. Your store will be created in a few seconds.
Phase 2: Design Your Store (Steps 6–9)
Step 6: Edit Your Store Header
The editor opens with your new site. Everything you see on screen is clickable and editable. The top bar offers three editing modes:
- Edit Header – changes to your store name, logo, navigation links, and the top contact bar
- Edit Page – modifications for homepage sections (hero, features, about us, etc.)
- Edit Footer – updates to footer links, contact info, and copyright
Click Edit Header. In the right panel, click the placeholder store name (e.g., "HamroShop") under the NAVBAR section and type your actual store name. The panel provides two views: Element View (edit individual items) and Object Strategy (AI‑assisted editing logic).
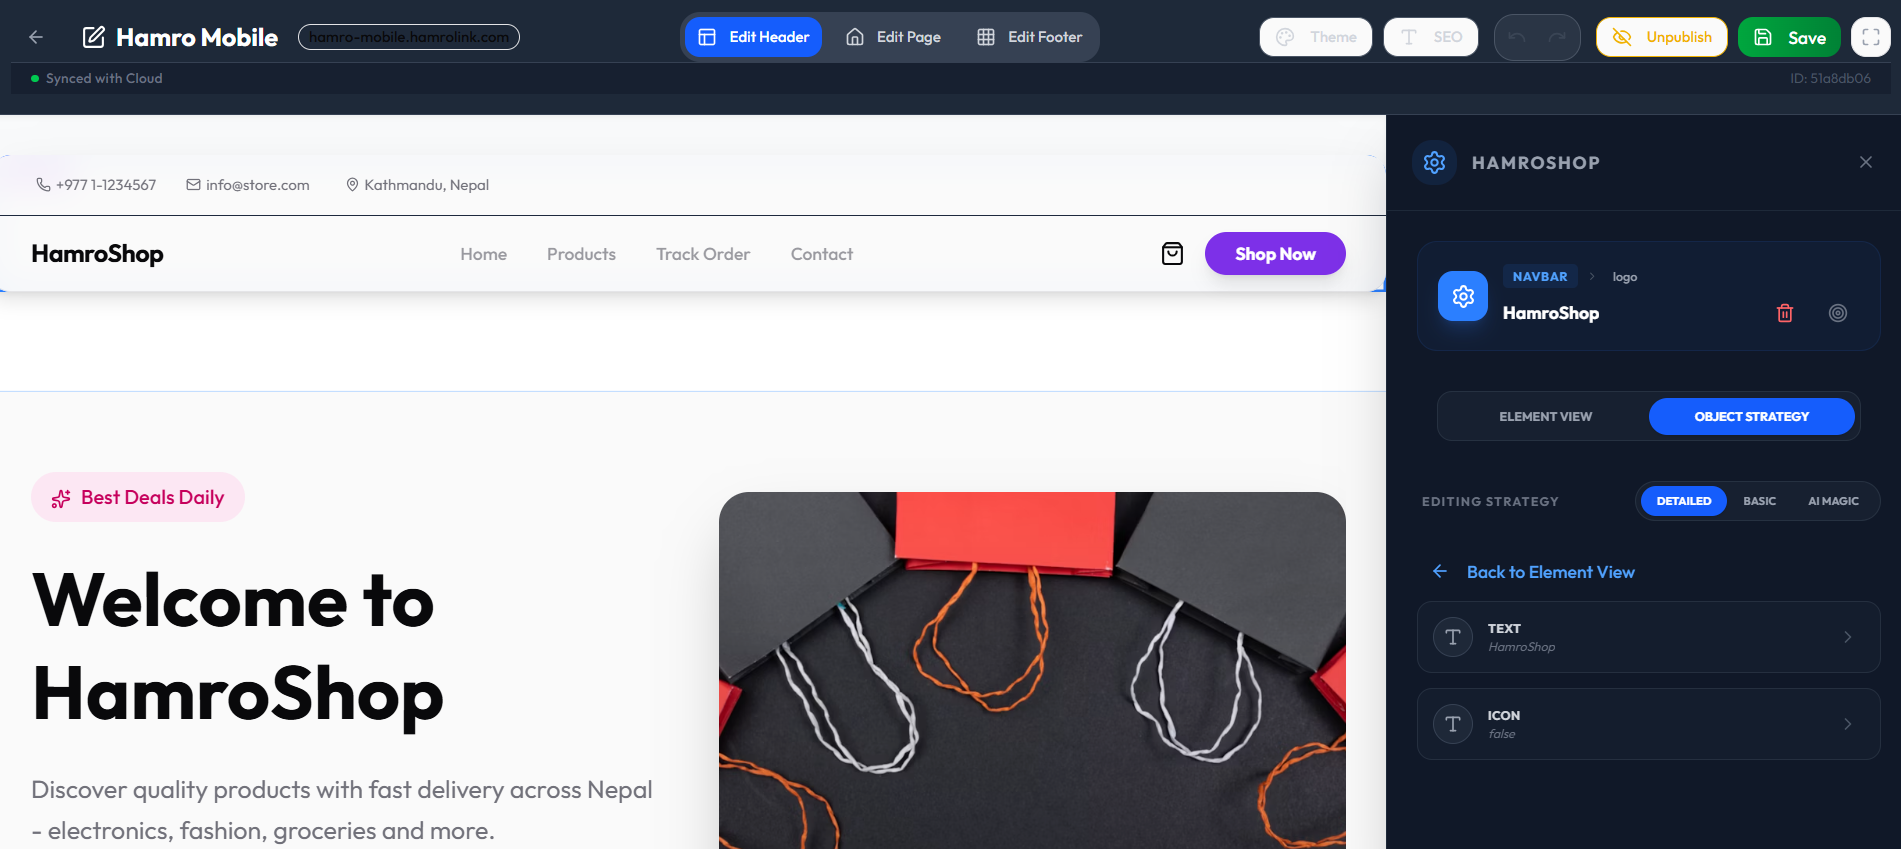
Always save your work. Look for "Synced with Cloud" in green at the top left. If it says "Unsaved Changes," click the Save button before moving to another page.
Step 7: Edit Your Homepage Content
Click Edit Page in the top bar to work on your homepage. Click any text on the screen – the hero title, tagline, button text, or statistics – and the right panel opens the CONTENT editor for that element.
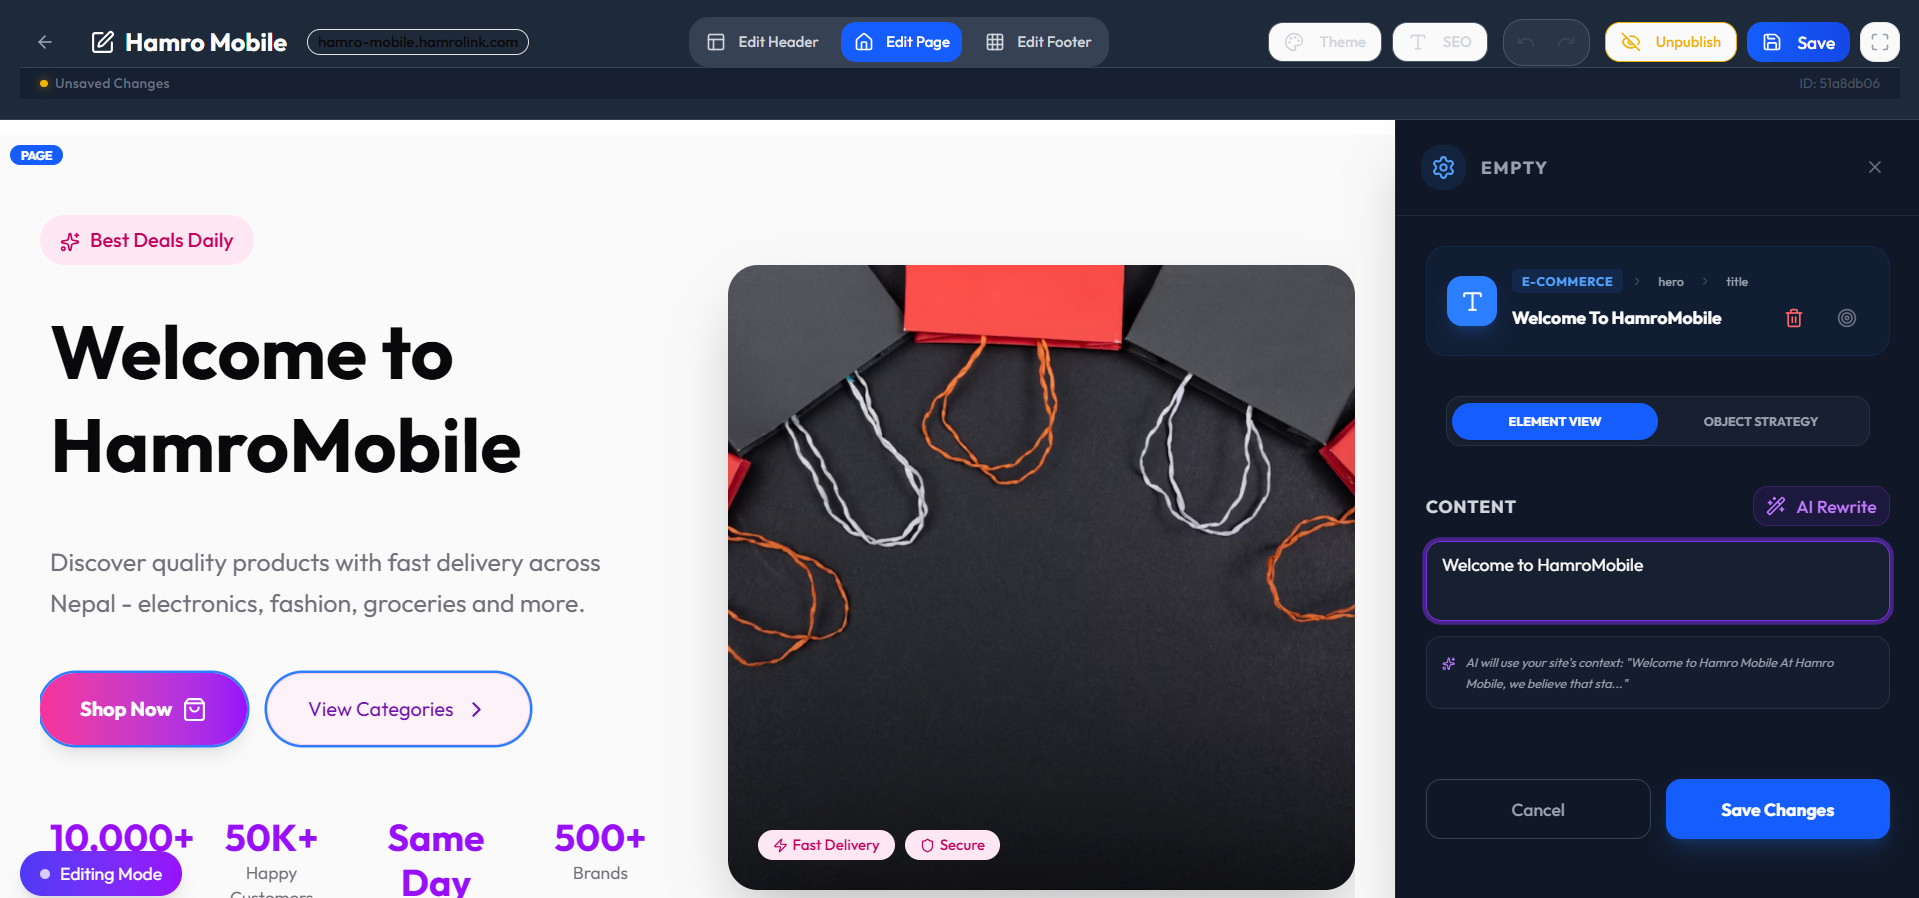
An important feature here is the AI Rewrite button. When you click it, the system generates new text based on your business description from Step 5. This is useful for creating unique hero headings, about sections, and feature descriptions. Always review the generated text to make sure it accurately represents your business. Click Save Changes after each edit.
Step 8: Preview Your Live Store
Your store is already publicly available. Copy the subdomain URL from the editor’s top bar and open it in a new browser tab to see exactly what your customers will see.
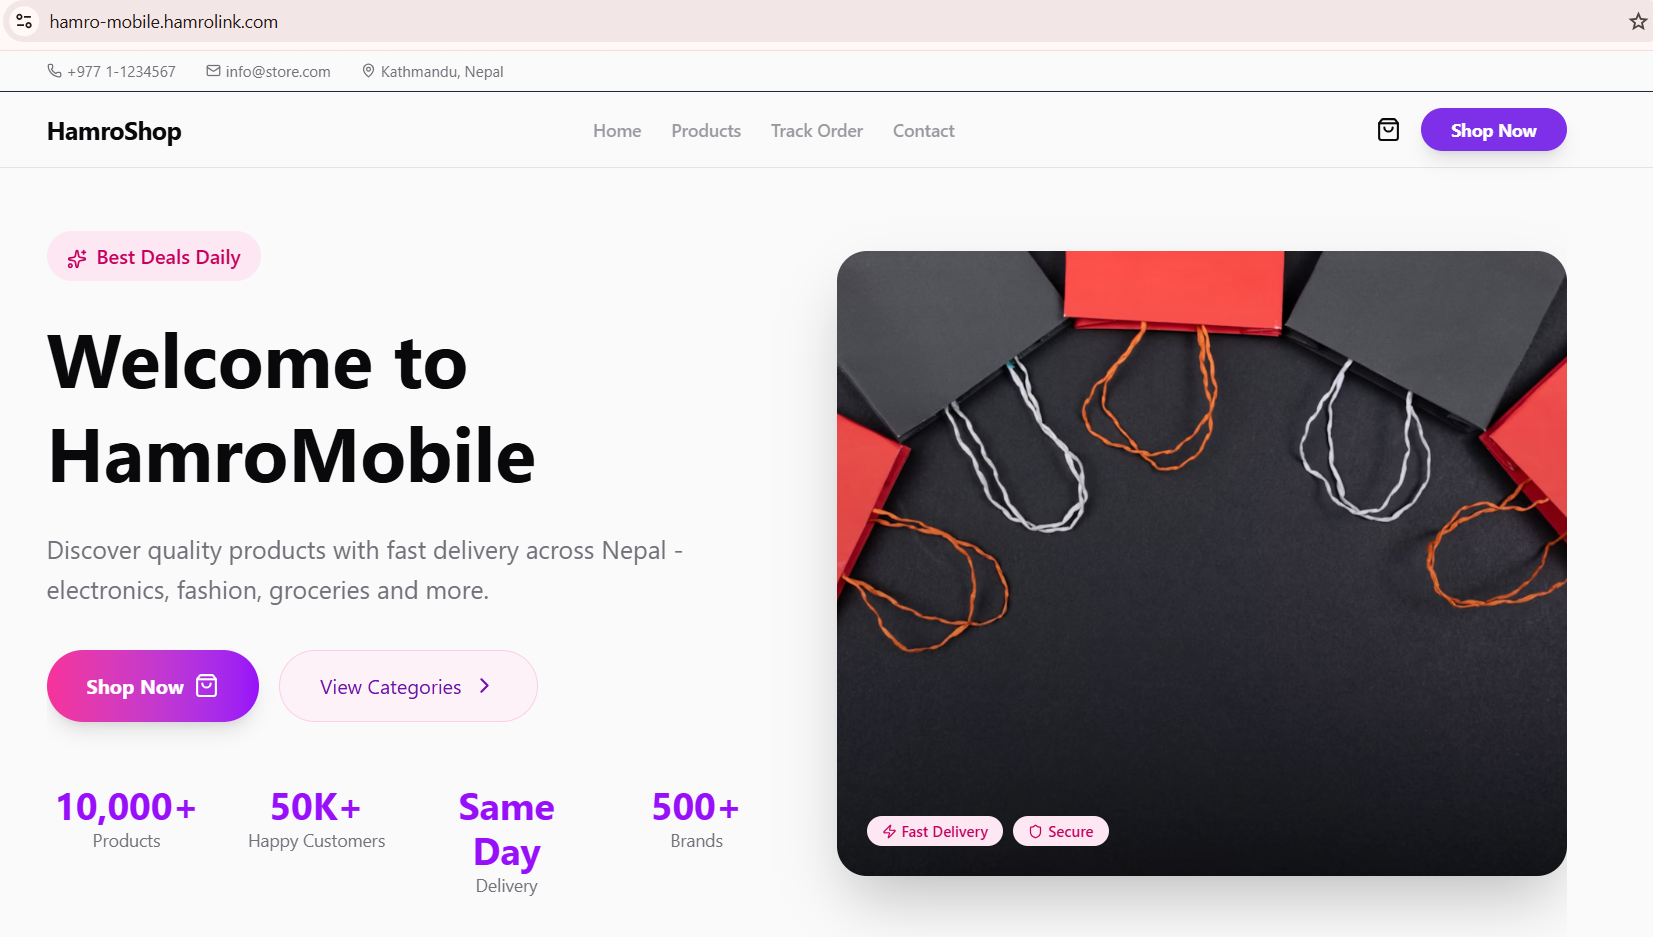
The public view includes:
- Your store name and navigation menu (Home, Products, Track Order, Contact)
- A hero section with your tagline and call‑to‑action buttons (Shop Now, View Categories)
- A trust stat bar – edit numbers like "10,000+ Products" to match your actual inventory
- Trust badges: Fast Delivery, Secure Payment
This is your real, working storefront. You can share this URL on Facebook, WhatsApp Business, and Instagram immediately.
Step 9: Update Your Auto‑Generated Pages
Return to the HamroLink Dashboard, click your website name, and scroll to see all pages that were created automatically.
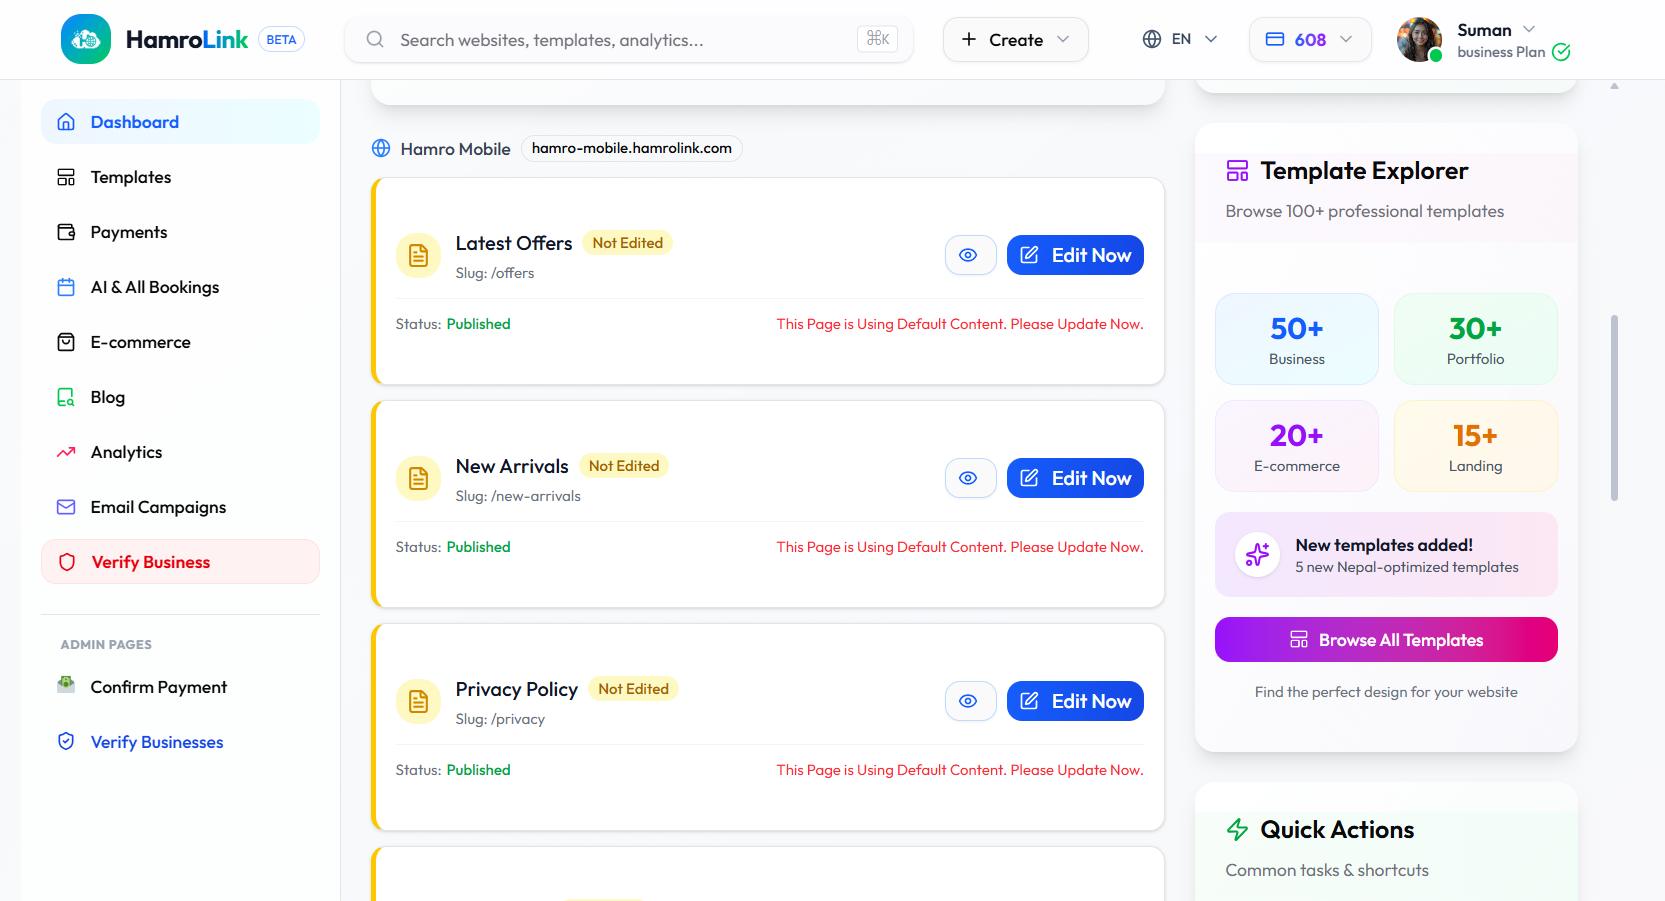
For every e‑commerce site, HamroLink auto‑creates:
- Latest Offers (
/offers) – for promotions and deals - New Arrivals (
/new-arrivals) – for recently added products - Privacy Policy (
/privacy) – a legal requirement for any online store in Nepal
Pages marked "Not Edited — Using Default Content. Please Update Now." contain placeholder text. If a customer sees default content, it harms your credibility immediately. Click Edit Now on each page and replace generic text with your real information. The left sidebar also gives you quick access to E‑commerce, Blog, Analytics, Email Campaigns, and Business Verification tools.
Phase 3: Add Your Products (Steps 10–13)
Step 10: Open the E‑commerce Dashboard
Click E‑commerce in the left sidebar. This is the operations center for your store.
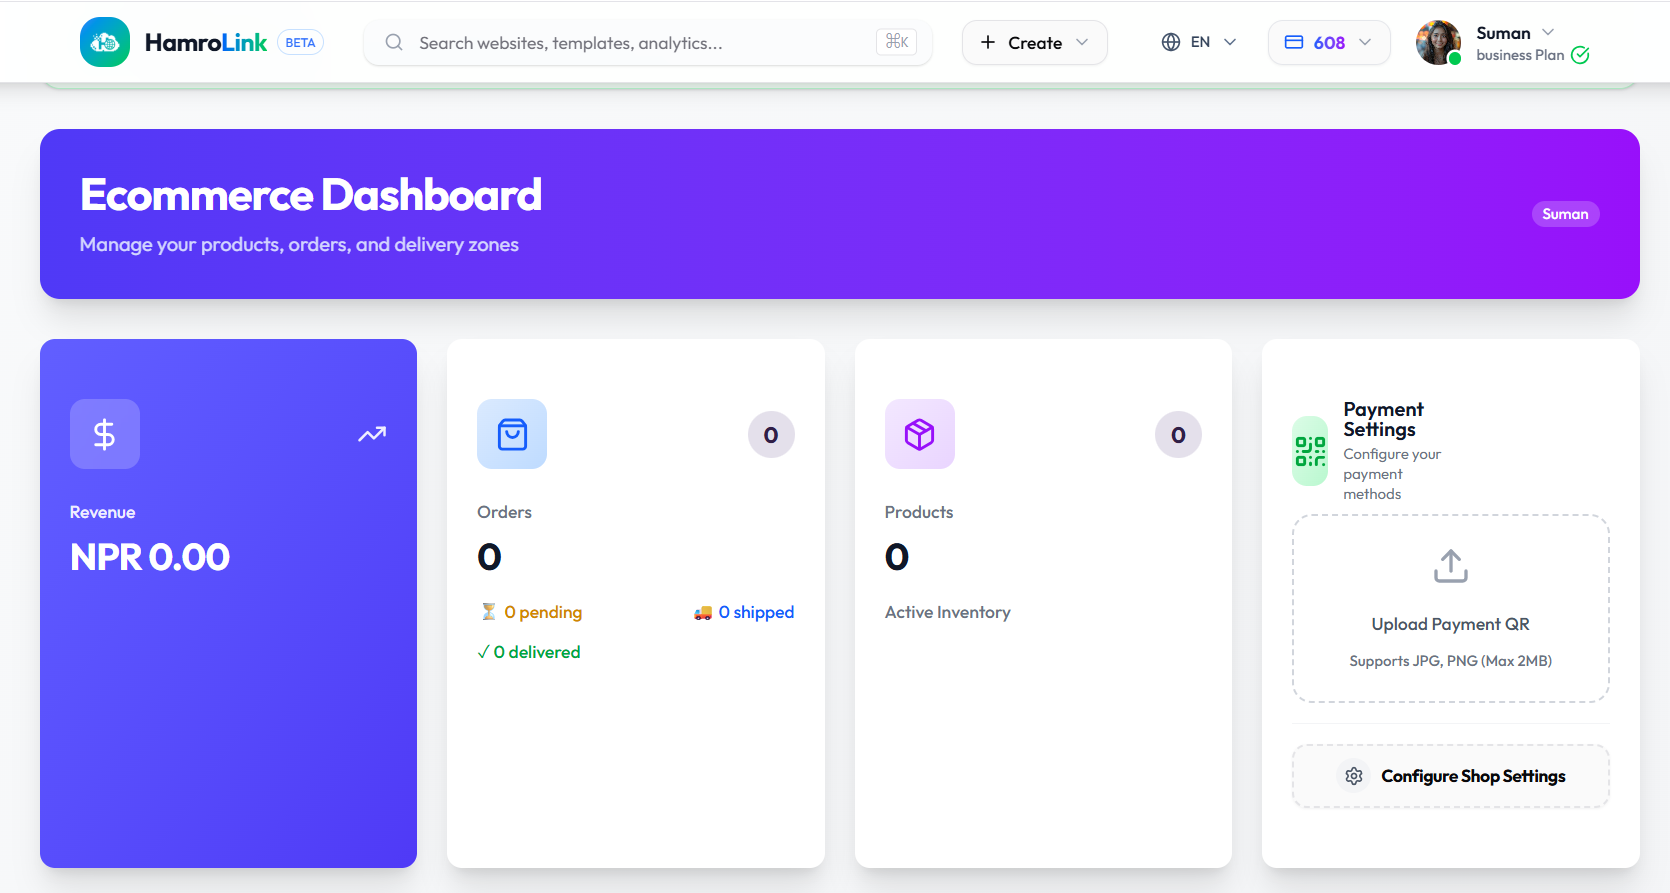
The dashboard is divided into key panels:
- Revenue – total sales in NPR (updates automatically with each confirmed order)
- Orders – broken down into pending, shipped, and delivered
- Products – the number of active items in your inventory
- Payment Settings – where you upload your FonePay or eSewa QR code
Critical step: Before you add any products, go to Payment Settings → Upload Payment QR and upload a clear image of your FonePay or eSewa QR code. Without this, the payment step at checkout will be blank and customers cannot complete their purchase.
Step 11: Go to Product Inventory
Scroll down or click the Product Inventory tab. A brand‑new store will show "No products yet."
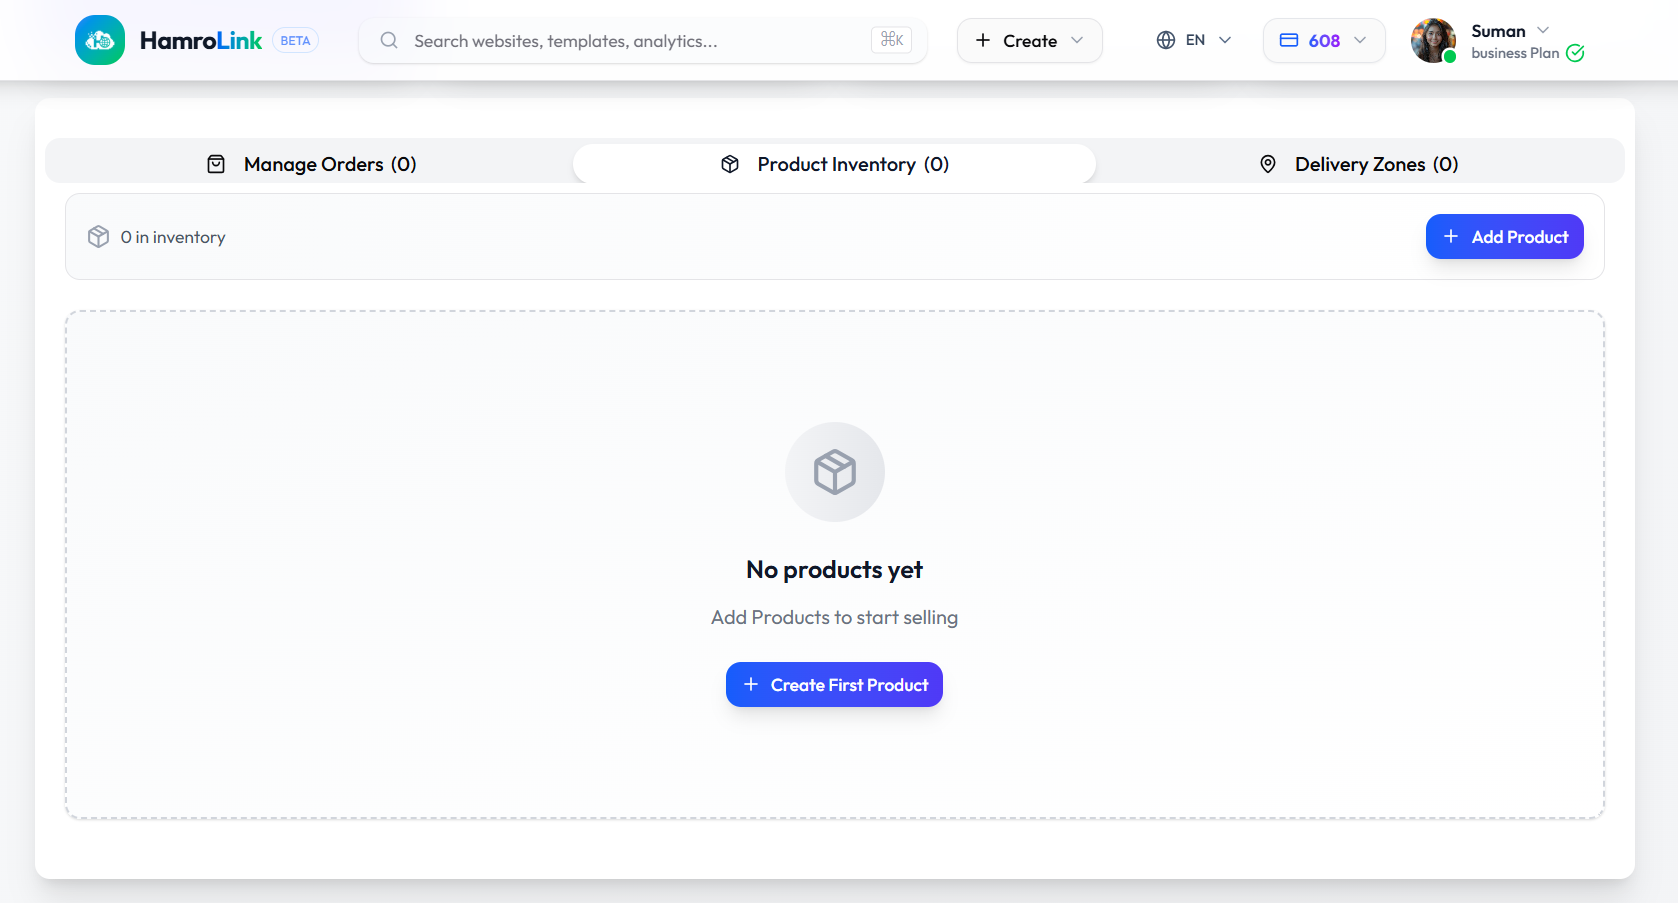
Click "+ Add Product" or "Create First Product" to begin.
Step 12: Add a Product – Name, Price, Variants, Images
The Add Product form contains everything you need to create a professional listing.
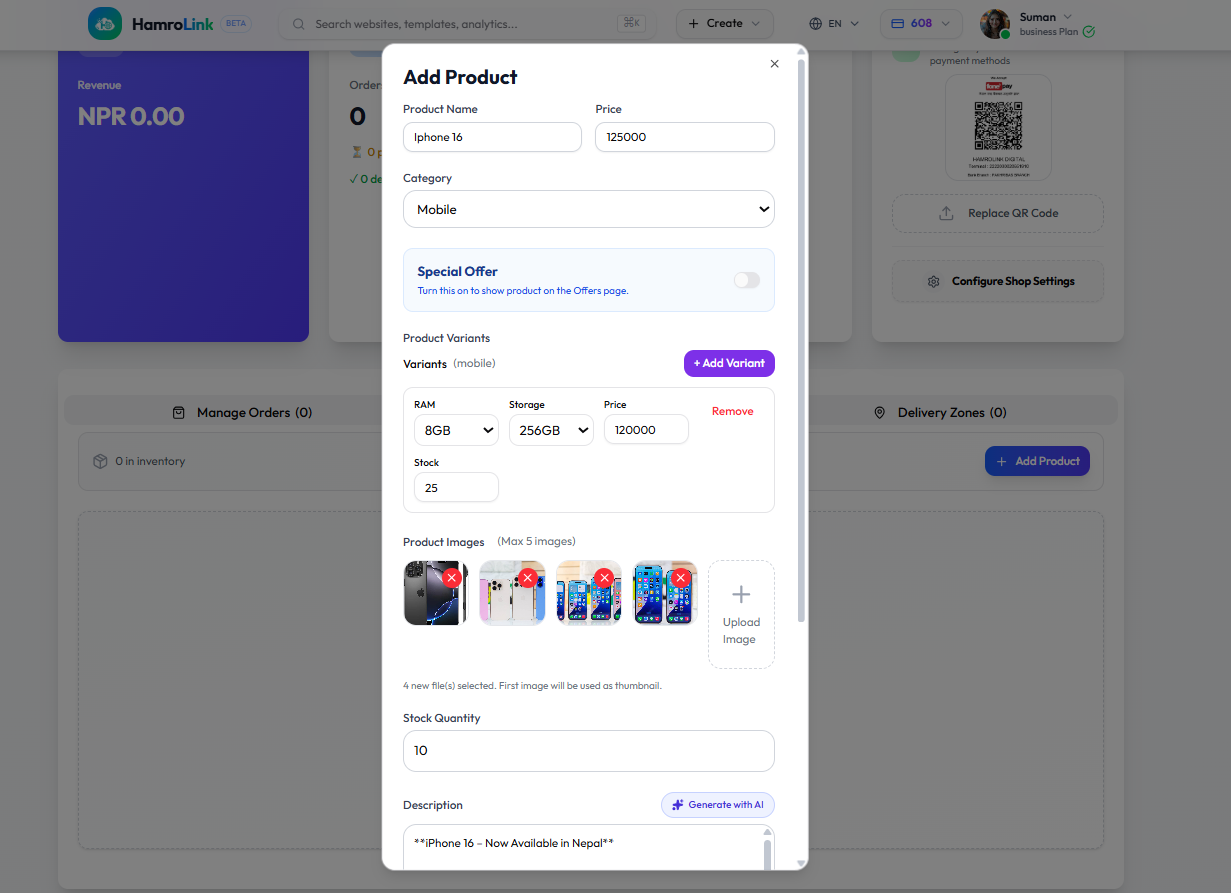
Basic Information:
- Product Name – be specific ("iPhone 16, 128GB" rather than just "Phone")
- Price – the base price in NPR
- Category – select from the dropdown (Mobile, Fashion, Electronics, etc.)
- Special Offer toggle – turn this ON if you want the product to appear on your
/offerspage
Product Variants (for items with different options):
Click + Add Variant and fill in the specifications. For a phone you might add:
- RAM: 8GB | Storage: 256GB | Price: NPR 120,000 | Stock: 25
You can add multiple variant rows, each with its own price and stock count.
Product Images:
Upload up to 5 images. The first image becomes the main thumbnail shown in all product listings. Use JPG or PNG files. Clear, well‑lit photos directly affect how many customers click "Add to Cart."
Step 13: Add Description, Stock, and Discount Coupons
Scroll down to complete the listing.
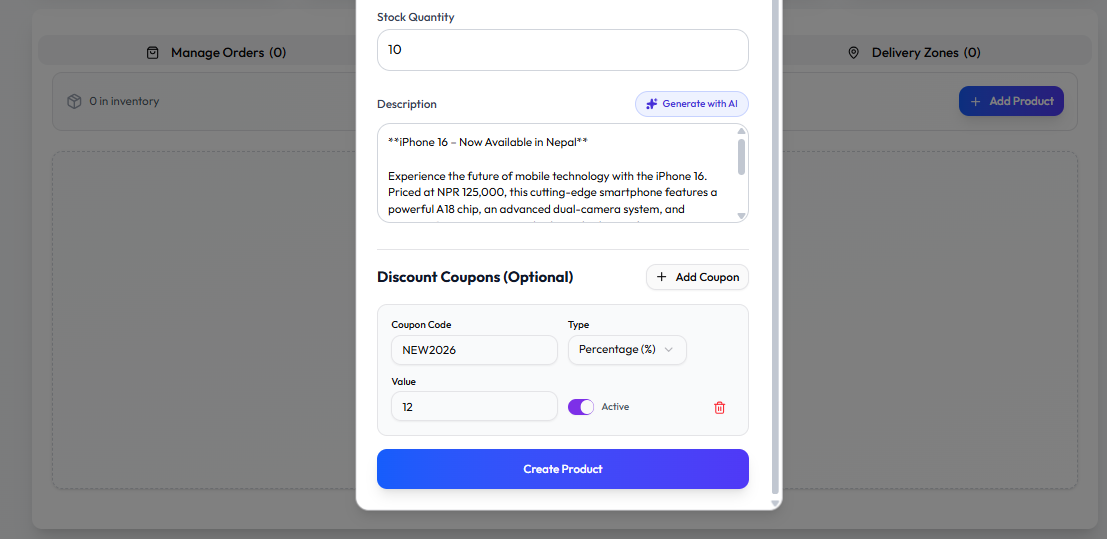
- Stock Quantity: The total number of units available across all variants.
- Description: Click "Generate with AI" to get a draft based on the product name, price, and category. Always review the generated text and add your own unique selling points.
- Discount Coupons (Optional): You can create coupon codes that customers enter at checkout. Set a Coupon Code (e.g.,
NEW2026), choose a Type (Percentage or Fixed Amount), enter a Value, and toggle Active to ON.
Click "Create Product." Your product is now live and visible to anyone visiting your store.
Phase 4: Delivery & Checkout (Steps 14–20)
Step 14: Open Delivery Zones
Click the Delivery Zones tab in your E‑commerce Dashboard. Delivery zones define where you are willing to ship and how much you charge.
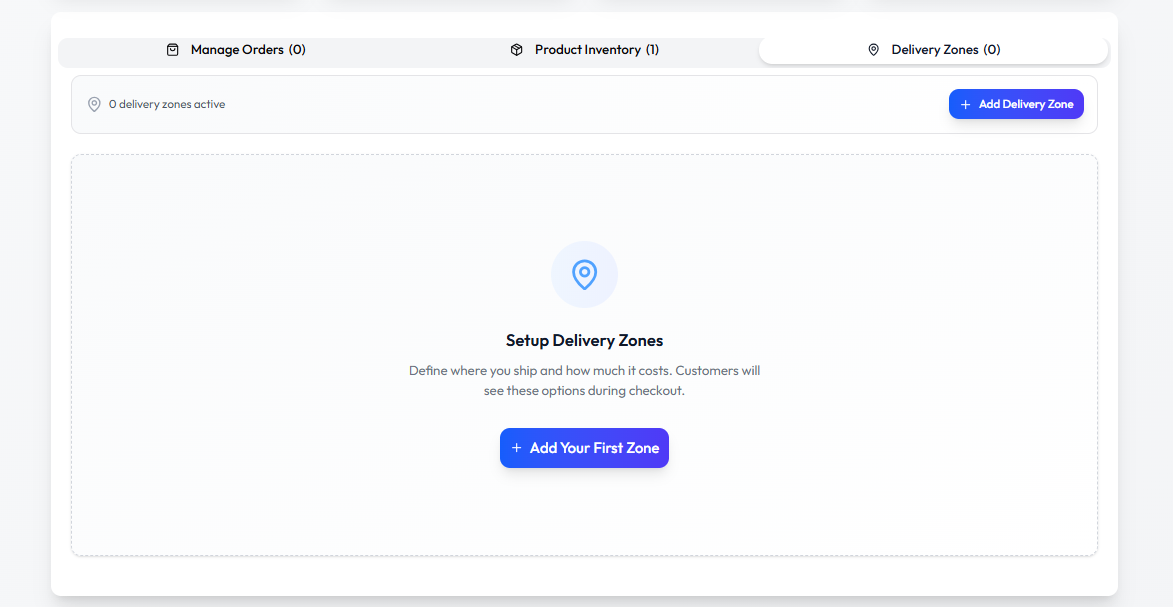
If no zones are configured, the delivery step at checkout will be empty and customers cannot place an order. Click "Add Your First Zone" to begin.
Step 15: Add a Delivery Zone
Fill in the Add New Zone form:
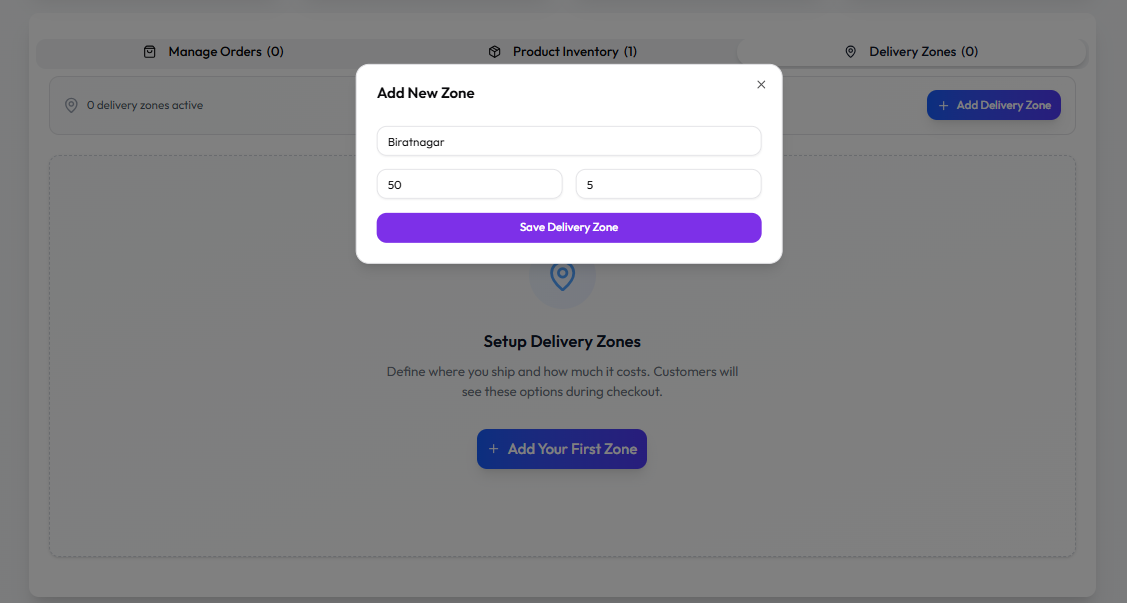
- Zone Name – the area you deliver to (e.g., "Kathmandu Valley," "Biratnagar," "Pokhara")
- Delivery Price – the shipping fee you want to charge (e.g., NPR 50)
- Estimated Days – how many days delivery usually takes (e.g., 2-3)
Click Save Delivery Zone. Repeat this for every area you cover. Adding a "Local Pickup" zone (price: NPR 0) is a smart move, as free pickup often increases conversion.
Step 16: Confirm Your Products Are Live
Visit your store’s Products page. Everything you added is now public and searchable.
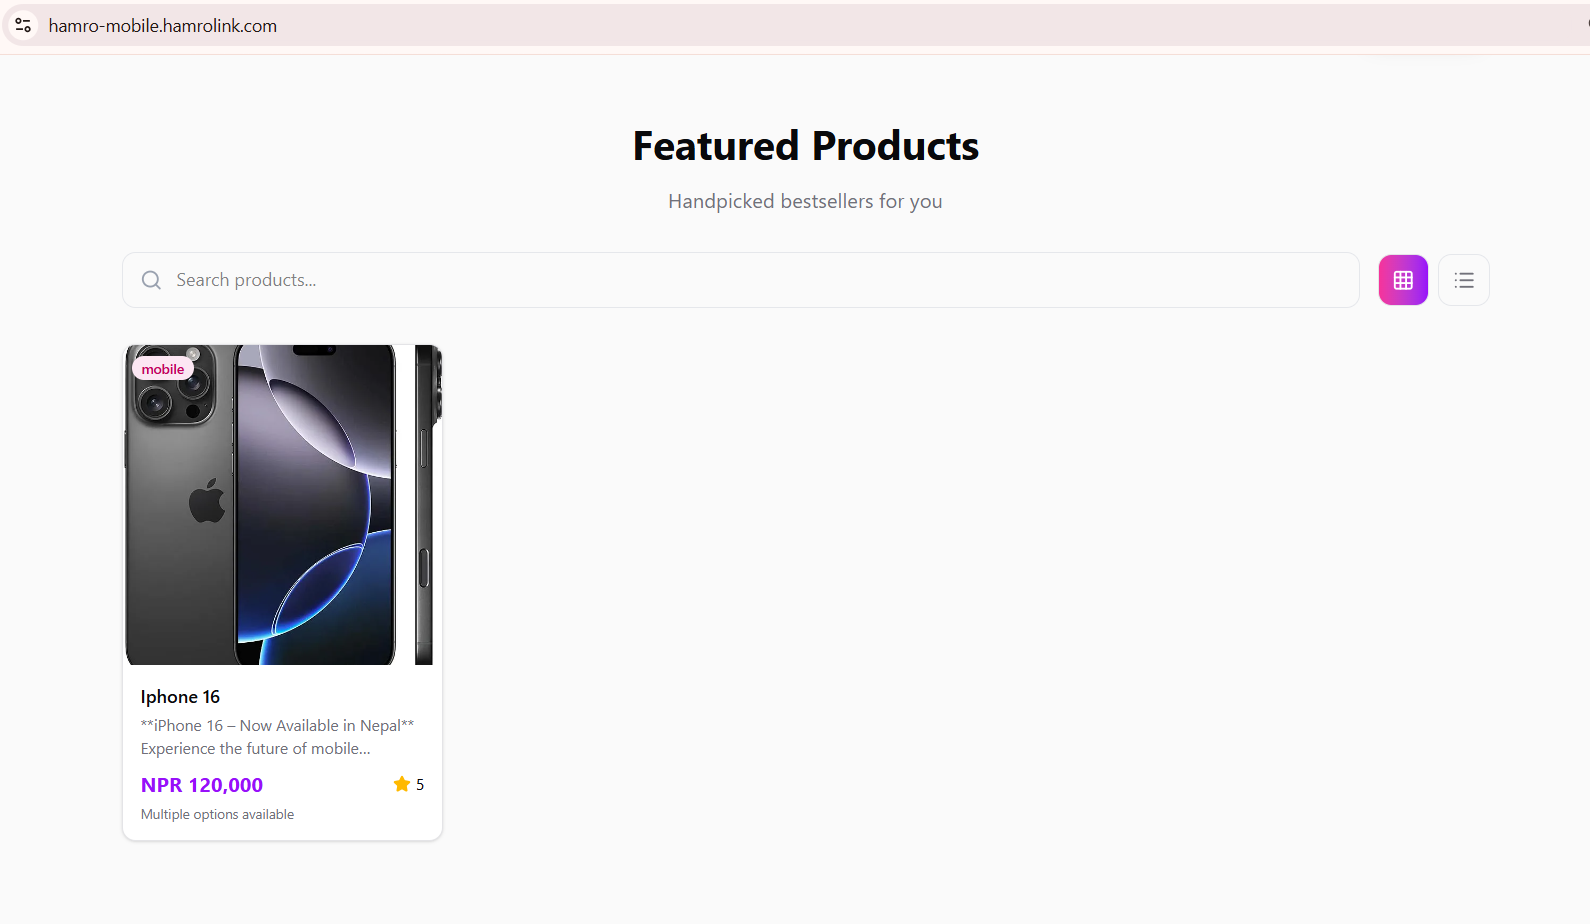
Each product card shows the thumbnail image, a category badge, the product name, the price in NPR, a star rating, and variant availability. Customers can search by name and toggle between grid and list view.
Step 17: The Product Detail Page
Click any product card to see the full product page that customers experience.
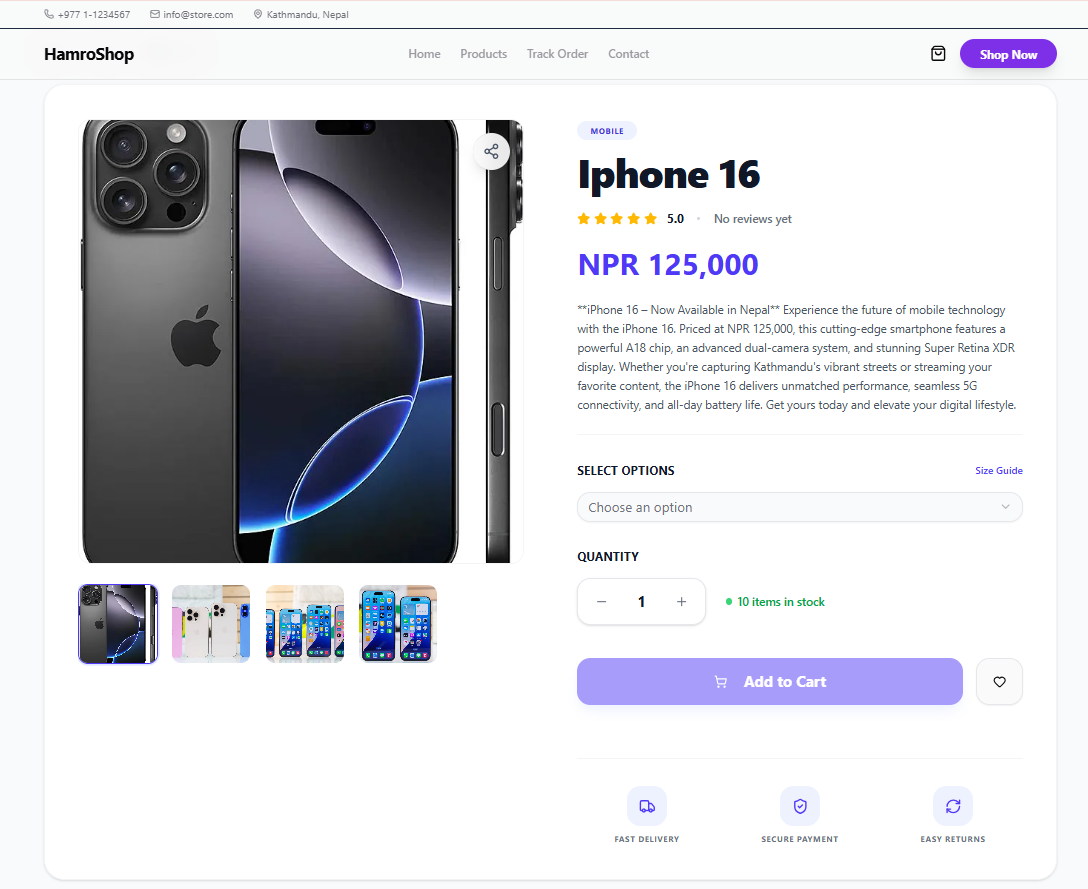
This page includes:
- An image gallery with clickable thumbnails
- Product name, category, and rating
- Price in NPR
- Your custom description
- Variant selector (size, color, RAM, etc.)
- Live stock count (e.g., "10 items in stock")
- Add to Cart and Wishlist buttons
- Trust badges for Fast Delivery, Secure Payment, and Easy Returns
High‑quality images and a clear description on this page directly increase your sales.
Step 18: The Checkout Page
When a customer adds a product and proceeds to checkout, they first see a summary.
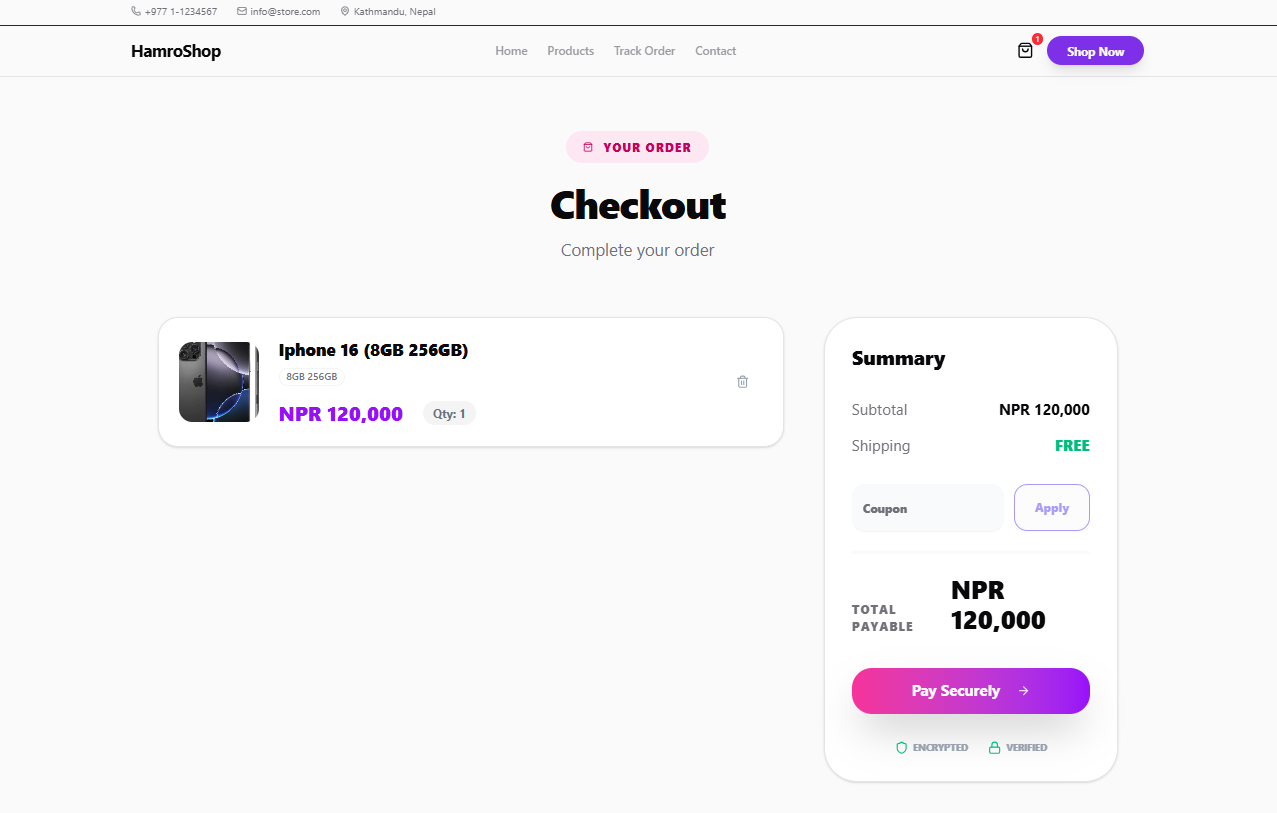
The summary shows:
- The product, chosen variant, and quantity
- Subtotal plus shipping
- A coupon code field
- The total payable amount in NPR
- A "Pay Securely" button with trust badges (Encrypted + Verified)
Step 19: HamroCheckout – Customer Fills Personal Info
Clicking "Pay Securely" opens HamroCheckout, a 3‑step modal that uses encryption to protect customer data.
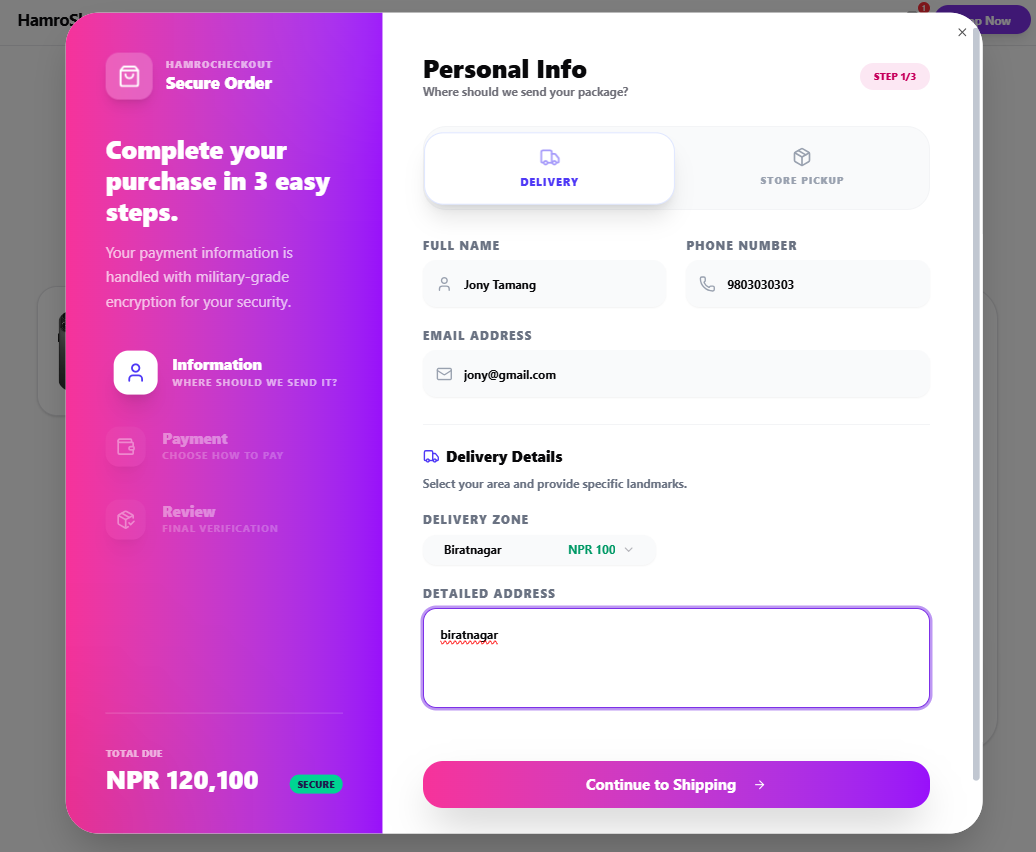
Step 1 of 3 – Personal Info:
- Full name and phone number
- Email address (for order confirmation)
- Choice between delivery or store pickup
- Selection of a delivery zone (prices from your Step 15 setup appear here)
- Detailed address and landmark
The total amount due (product + delivery) is displayed at the bottom. The customer then clicks "Continue to Shipping."
Step 20: HamroCheckout – QR Payment
The final checkout screen displays your uploaded FonePay QR code.
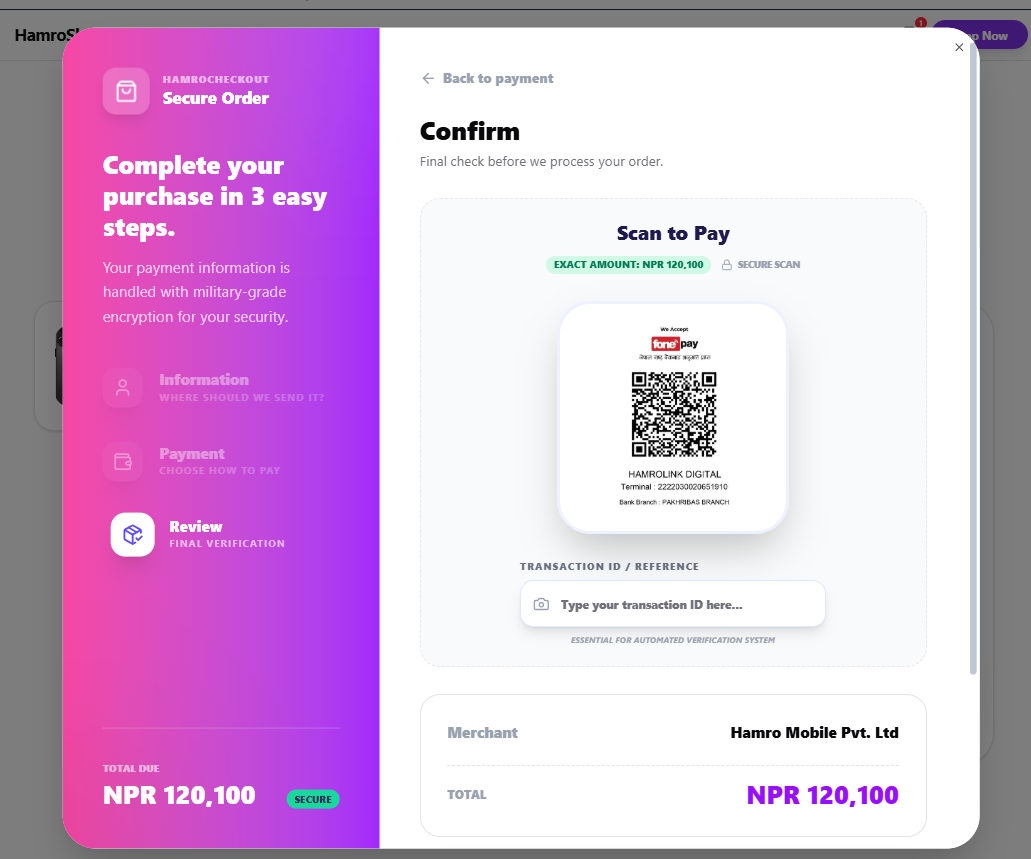
The customer sees:
- The exact amount to pay (e.g., NPR 120,100)
- Your FonePay QR code to scan
- A Transaction ID field to enter after completing the payment
This works with FonePay, eSewa, Khalti, ConnectIPS, and most bank QR codes in Nepal. The Transaction ID is what you will use to verify the payment in your own mobile wallet before shipping.
Phase 5: Orders & Tracking (Steps 21–22)
Step 21: Manage Orders from Your Dashboard
When an order comes in, your E‑commerce Dashboard updates in real time.
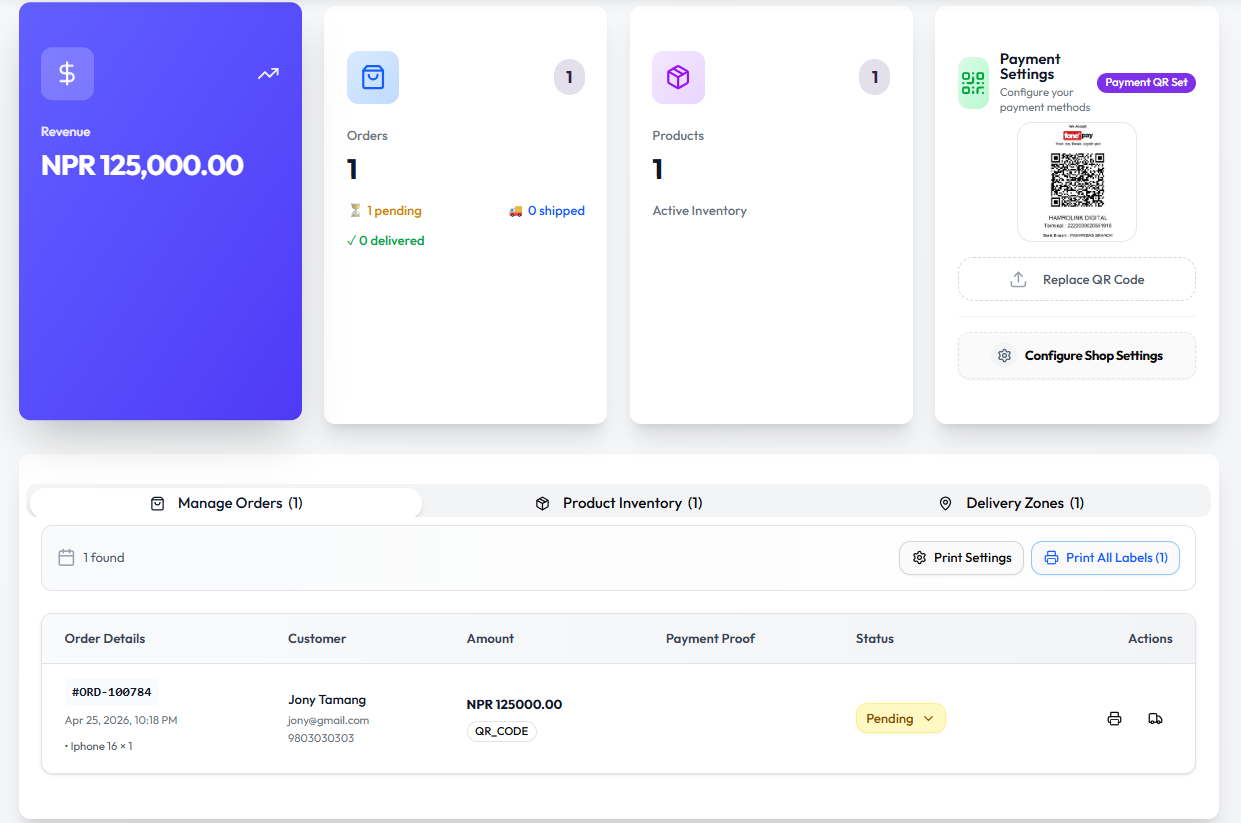
The order table displays the Order ID, date and time, customer name and contact, amount, payment method, and a Status dropdown. To process an order:
- Verify the Transaction ID against your FonePay or eSewa app.
- Change the order status: Pending → Payment Confirmed → Shipped → Delivered.
- Use the Print All Labels button to generate shipping labels if needed.
Customers receive automatic notifications as you update the status.
Step 22: Customer Order Tracking
Your store’s Track Order page lets customers check their delivery status without contacting you.
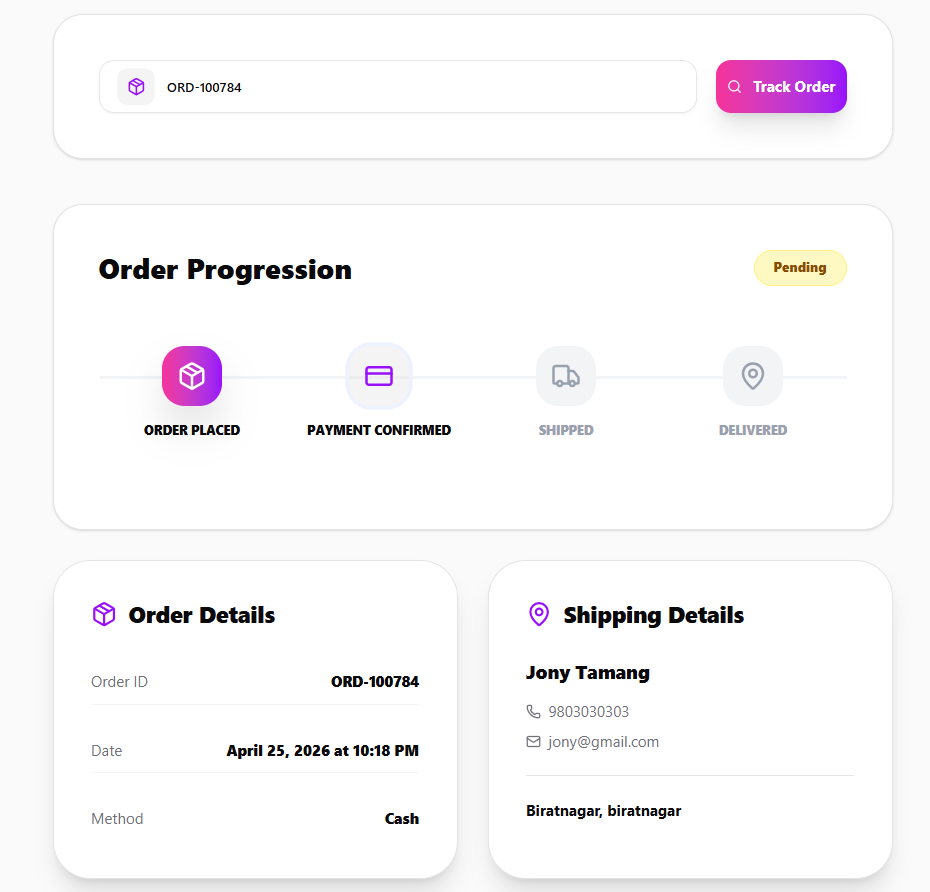
Customers enter their Order ID and see a visual timeline:
Order Placed → Payment Confirmed → Shipped → Delivered
They also see the full order details. This page alone eliminates most “Where is my order?” messages as your order volume grows.
Common Mistakes That Prevent a First Sale
These issues frequently cause new online stores to fail – avoid them:
- No payment QR uploaded – Customers reach the end of checkout with no way to pay. Upload your QR code in Payment Settings before you go live.
- Default placeholder text still visible – “This is default content” destroys trust instantly. Update every page with real information, especially the homepage hero and About section.
- Missing or poor‑quality product images – Products without clear photos are ignored. Use at least 3 well‑lit, natural‑light photos per product.
- No delivery zones configured – Without zones, the checkout delivery step is empty and purchases cannot be completed. Add at least one zone.
- Not testing the checkout yourself – Spend 5 minutes going through your own checkout as if you were a customer. This simple test can catch a broken flow before you share your store link.
- Skipping business verification – Verified stores display additional trust badges. Complete the Verify Business process in the sidebar.
Your 22-Step Launch Checklist
| # | Step | Done? |
|---|---|---|
| 1 | Sign in to HamroLink | ☐ |
| 2 | Review the Dashboard | ☐ |
| 3 | Choose an E‑commerce template | ☐ |
| 4 | Fill in business details and subdomain | ☐ |
| 5 | Add description, social links, and logo | ☐ |
| 6 | Edit the store header in the Visual Editor | ☐ |
| 7 | Edit homepage content with AI Rewrite | ☐ |
| 8 | View and note your live store URL | ☐ |
| 9 | Update all auto‑generated pages | ☐ |
| 10 | Open the E‑commerce Dashboard | ☐ |
| 11 | Upload your payment QR code | ☐ |
| 12 | Add products with variants and images | ☐ |
| 13 | Generate descriptions and add a coupon | ☐ |
| 14 | Open the Delivery Zones tab | ☐ |
| 15 | Add at least one delivery zone | ☐ |
| 16 | Confirm your products are live | ☐ |
| 17 | Review the product detail page | ☐ |
| 18 | Test the checkout summary page | ☐ |
| 19 | Complete HamroCheckout Step 1 as a test | ☐ |
| 20 | Confirm the QR payment screen appears | ☐ |
| 21 | Process your first test order | ☐ |
| 22 | Verify the order tracking page works | ☐ |
After Your Store Goes Live – Promotion Tips
A store without visitors cannot make sales. Here are a few practical promotion ideas for Nepali businesses:
- Link everywhere – Add your store URL to your Facebook page button, WhatsApp Business profile, Instagram bio, business cards, and even your physical shop signboard.
- Leverage Facebook and Instagram – Post product photos with direct links to your store’s product pages. Run simple “boosted post” ads targeting your city or district.
- Offer a launch discount – Create a coupon code (like
LAUNCH10) and announce it on your social media to drive the first orders. - Encourage word of mouth – Ask satisfied customers to share your store link. Even a small incentive can help.
- Keep your content fresh – Regularly add new products and update your Offers page. Google favors stores that actively add new content. You can also use the built‑in Blog feature to publish articles that attract visitors from search engines.
Final Thoughts
Setting up a professional online store in Nepal is no longer something that requires a big budget or a developer. By following the steps in this guide, you can have a complete, secure, FonePay‑ready e‑commerce website up and running in under an hour – one that frees you from the chaos of Facebook DMs and missed orders.
Take your time, fill in every detail honestly, and test the full checkout before you announce your launch. Once live, focus on spreading the link and making those first few sales. Good luck.
If you’re ready to start, you can create a free HamroLink account here.
Guide last updated: April 2026. Based on HamroLink Beta. Features and UI may change. For the most recent documentation, visit the HamroLink Docs.